> ## Documentation Index
> Fetch the complete documentation index at: https://www.spacebring.com/docs/llms.txt
> Use this file to discover all available pages before exploring further.
# Members
> Understand the member role, learn how to invite, mass invite, and manage members
## Who is a member
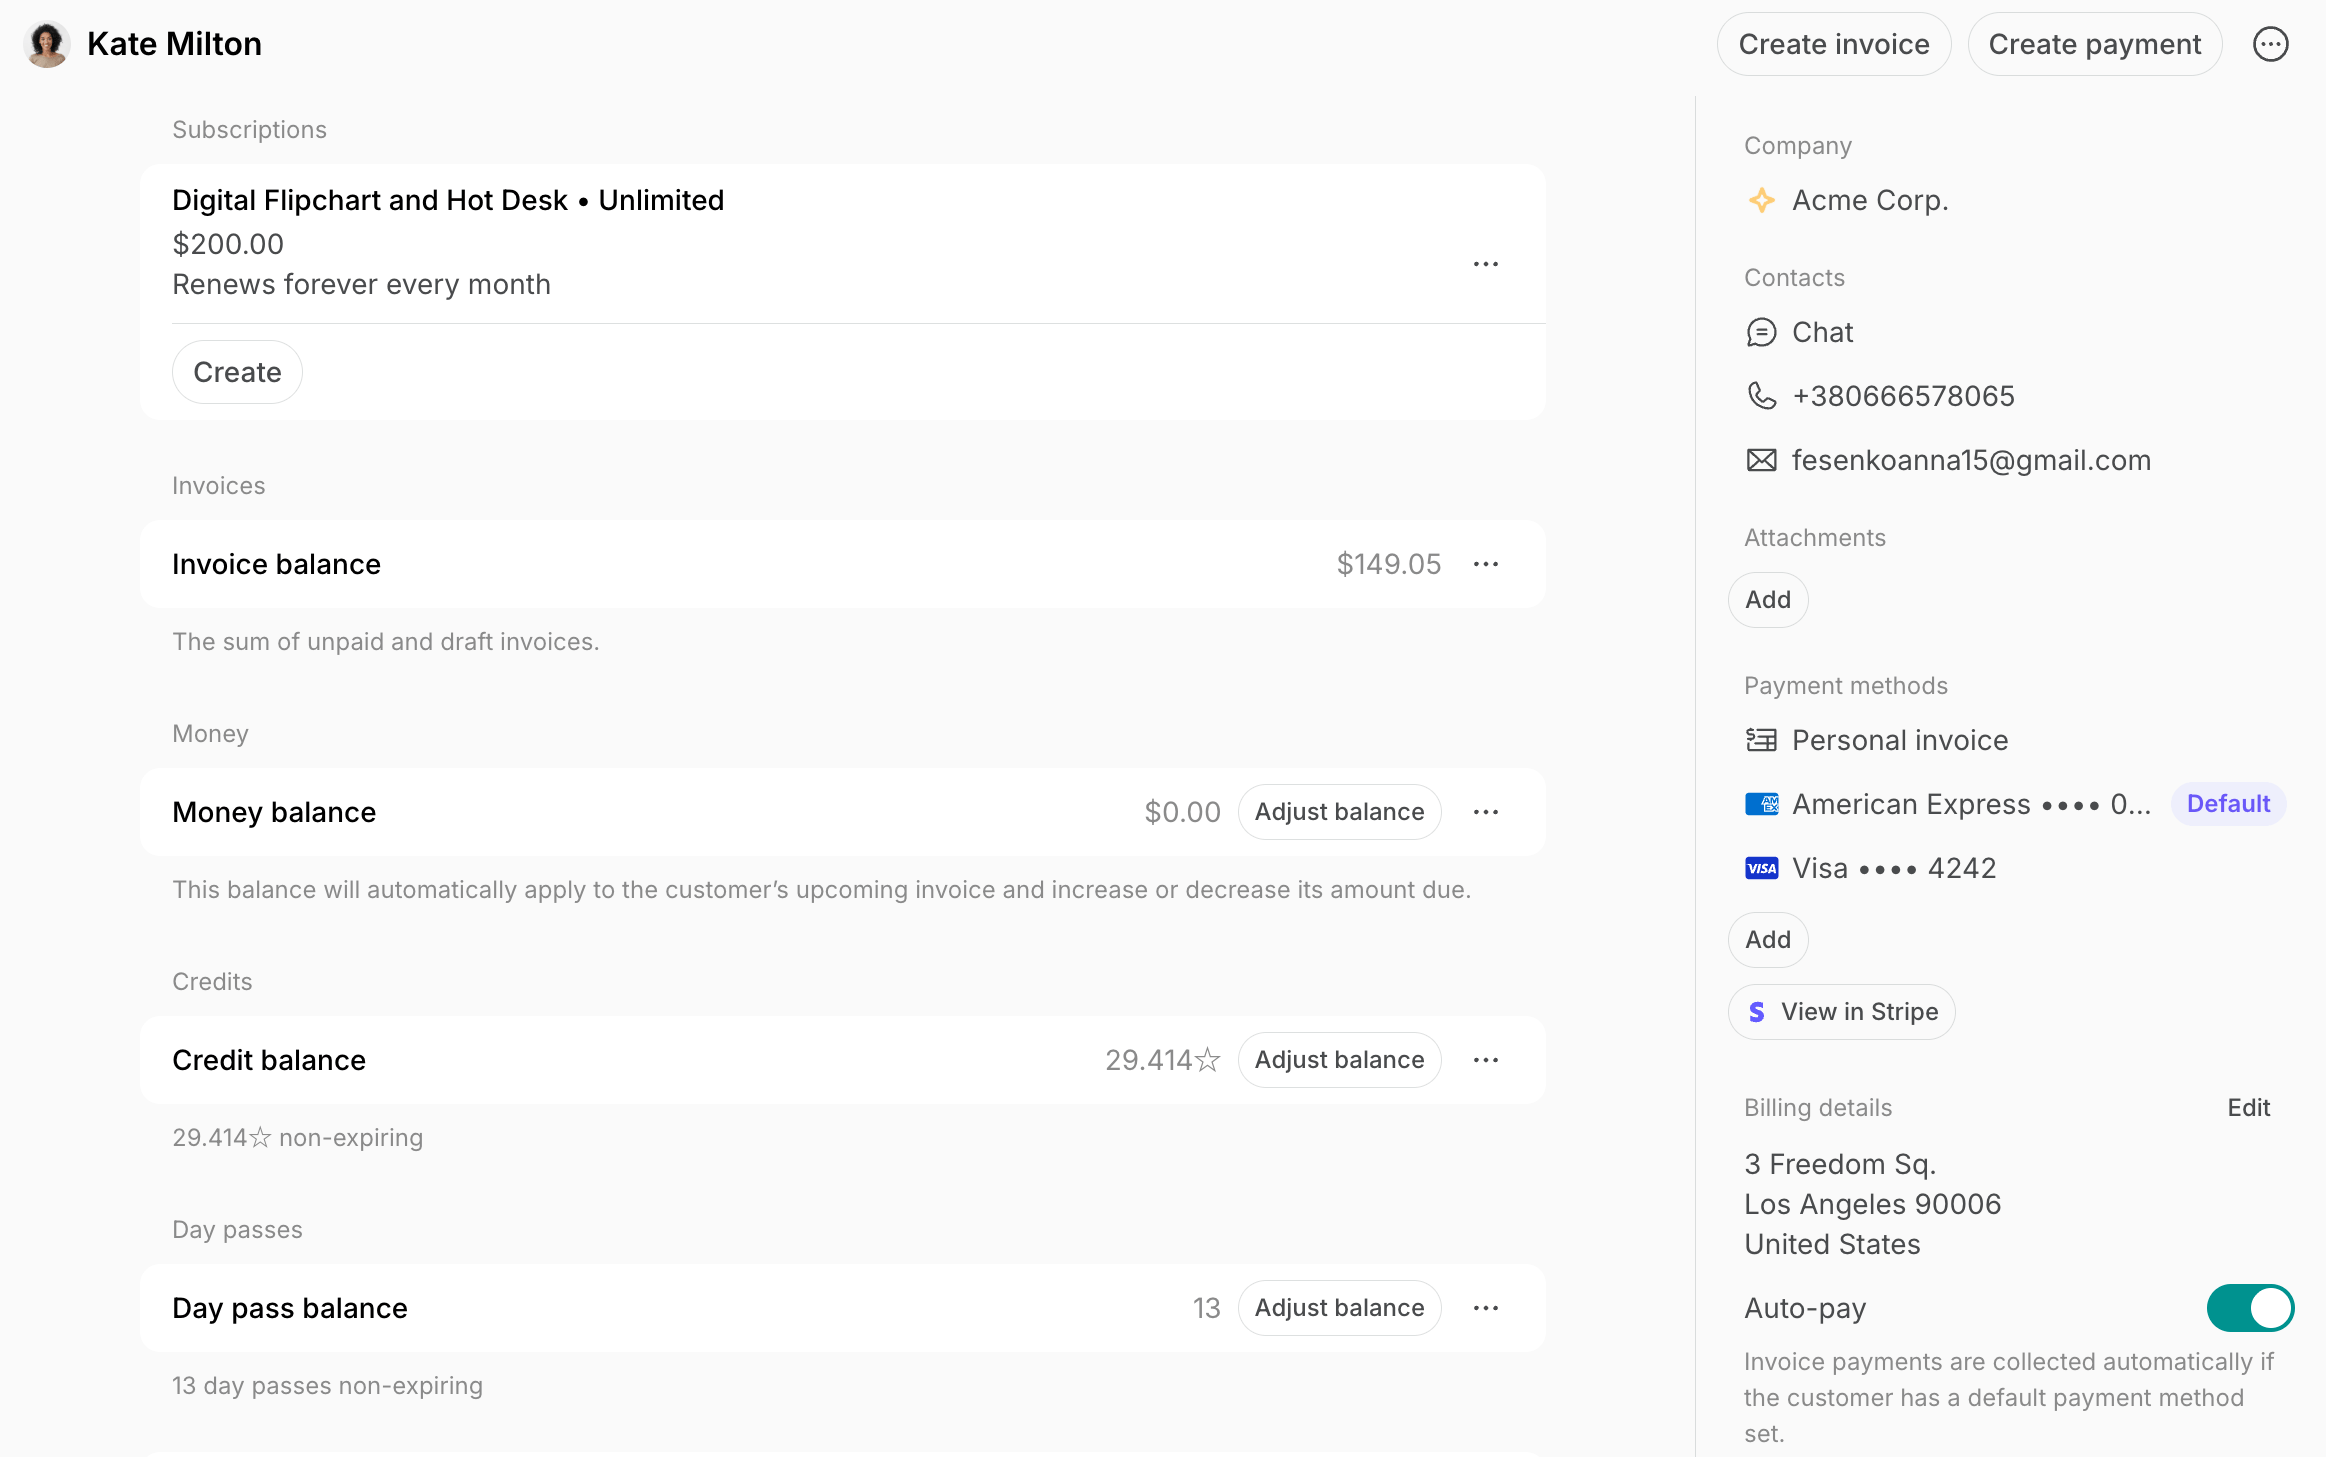
A member is a customer who uses your space's services often and was, therefore, granted access to the members-only parts of the location.
Here is an example of the member profile:
## Invite a member
Administrators can invite an unlimited number of members to each location. There are several ways to invite members:
* Send individual invitations
* Mass invite members
* Approve requests to join a location
### Prerequisites
1. Make sure that you have [permission](/docs/administration/permissions) to manage **Customers** in the location.
2. Collect the user's personal information: first name, last name (optional), email, and phone number (optional).
### Send an individual invitation
1. Go to the **Customers** page in the necessary location.
2. Press **Invite user** top right.
3. Fill in the user details.
* If you're inviting an administrator, enable the **Administrator** switch and [configure permissions](/docs/administration/permissions).
* If the user belongs to a company, select their company and manage the **Manager** toggle.
4. Click **Send invitation**. The user's creation date will appear in their profile in the **Activities** section.
### How a user gets an invitation
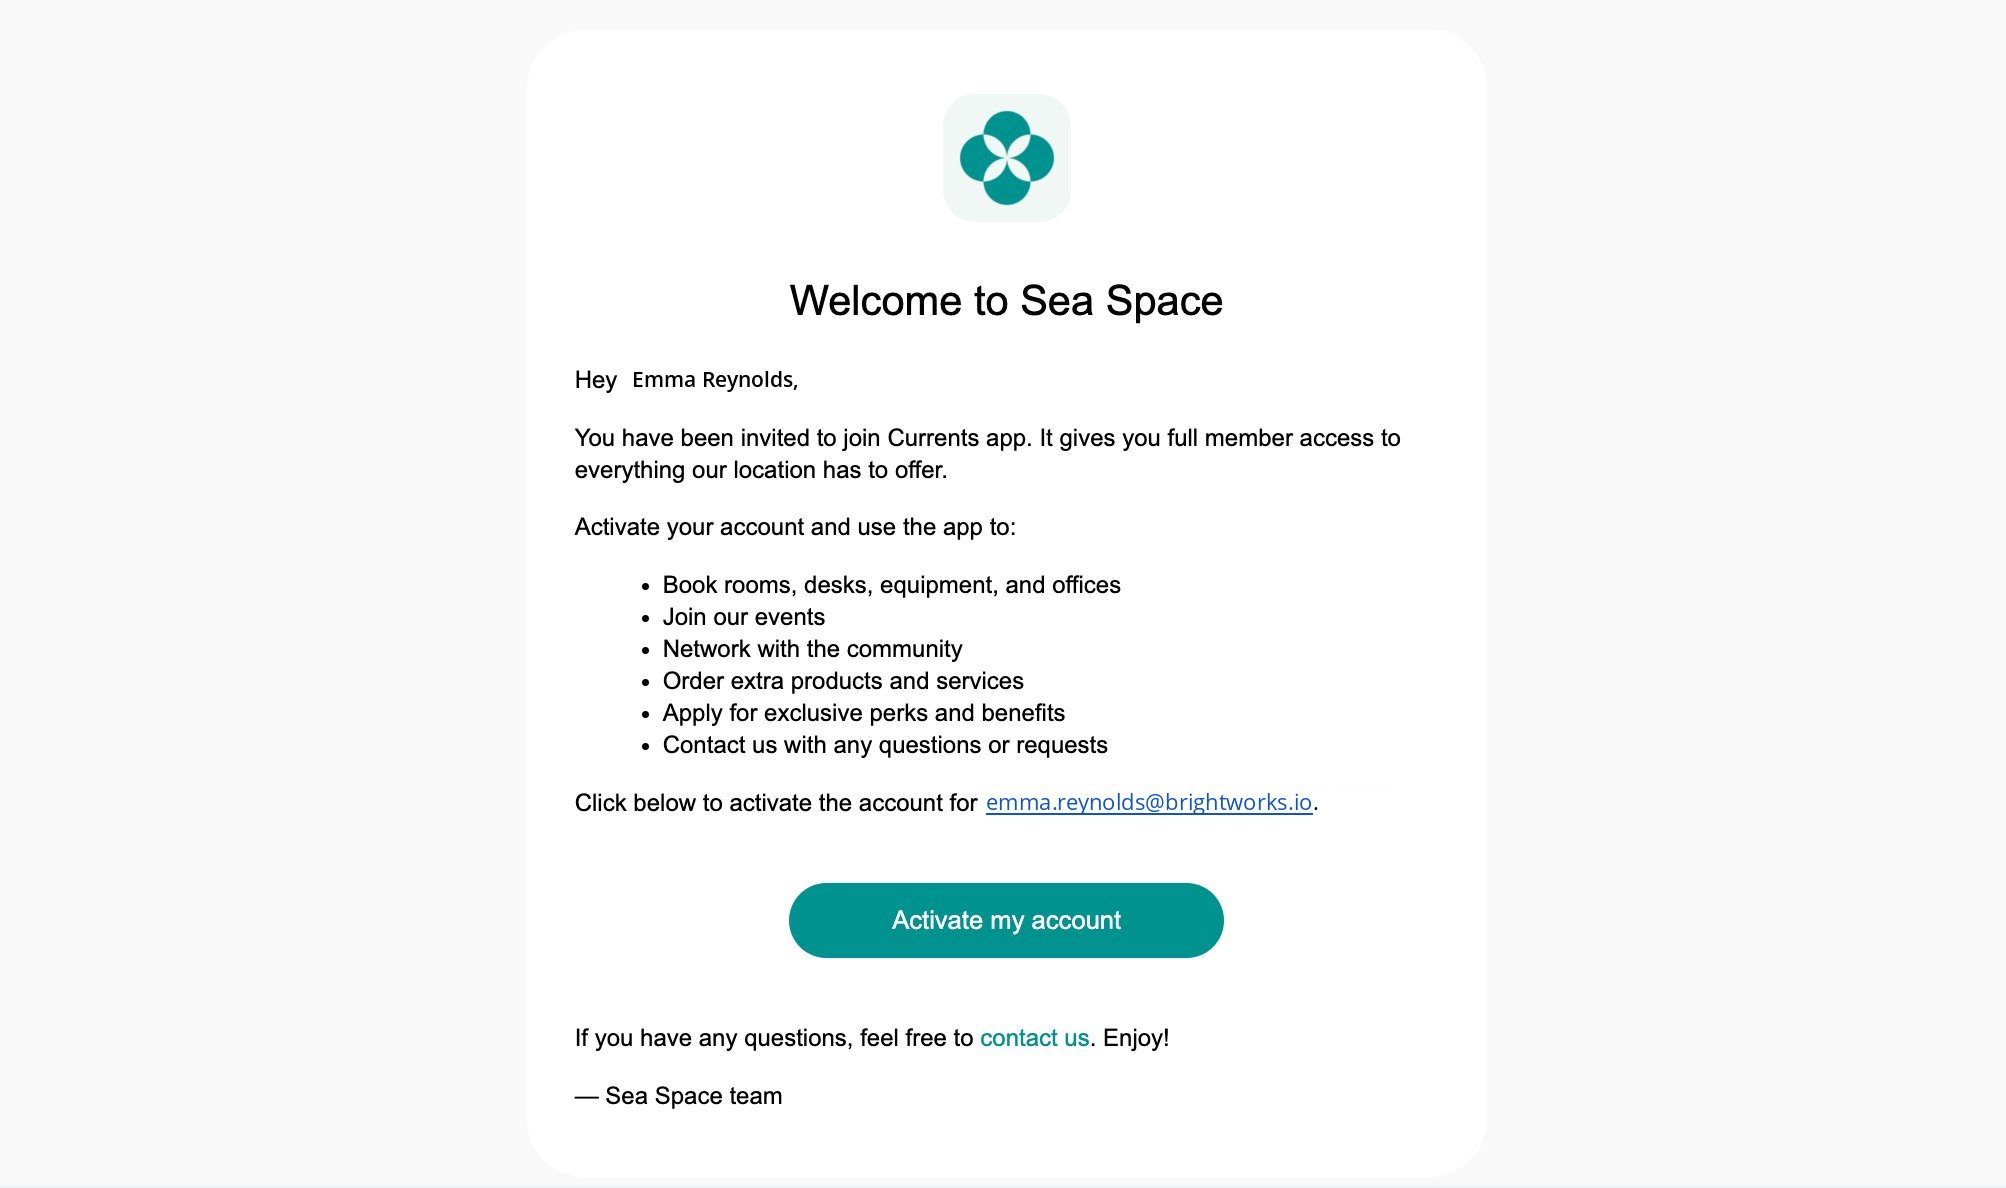
When an administrator sends the invitation or approves the request to join, the user receives either a default or [custom](/docs/general/customize-emails) invitation email to activate their account.
The user presses the **Activate my account** button and is navigated to member web portal or member mobile app. If the user clicks to activate their account within 24 hours of the invitation time, they are logged in automatically without any verification required.
If users joins later, they are asked to verify their email address with the confirmation code.
Users who haven't activated their account within 3 days after being invited receive an automated invitation reminder.
## Invite multiple members
You can easily invite multiple members at once and assign them to specific companies. This saves you a lot of time compared to manually inviting each member individually.
1. Prepare the following spreadsheet with members' personal details:
| | | | | |
| :---------- | :------------- | :------------ | :-------- | :--------------- |
| Column name | **First name** | **Last name** | **Email** | **Phone number** |
| Required | + | | + | |
2. Go to **Customers > (…)** top right **> Invite multiple users**, paste your member table, and send the mass invitation.
You can also select the invitation language, company, plan, subscription start and end date for each member during mass invitation.
### 1. Set up company profiles and subscriptions
Set up company profiles, subscriptions, and billing **before** inviting company members. When members receive their invitation, their access and entitlements will already be in place.
1. Prepare a spreadsheet with each company's name and subscription details.
2. Go to **Customers > (…) > Create multiple companies**, paste your list of company names to mass-create company profiles.
3. [Set a subscription](/docs/billing/subscriptions) for each company.
If company subscriptions use standard plan settings with no custom details or billing adjustments, you can also select plans for each company and mass-create subscriptions directly in the company creation window.
### 2. Invite company members
1. Prepare a spreadsheet(s) with each company's member details.
| | | | | | | |
| :---------- | :------------- | :------------ | :-------- | :--------------- | :----------- | :------------- |
| Column name | **First name** | **Last name** | **Email** | **Phone number** | **Language** | **Company ID** |
| Required | + | | + | | | |
You can get each company's ID from **Analytics** > **Companies** report and paste them into your member spreadsheet — this will automatically assign members to the right company upon invitation.
2. Go to **Customers > (…)** top right **> Invite multiple users** and paste your member table.
3. Alternatively, open a specific company profile > **Mass invite** on the right panel to invite that company's members separately.
4. In each company profile, designate a company manager — this person receives invoices and manages billing on the company's behalf.
You will receive a confirmation on the screen upon inviting new users. To distinguish the new members, a **New** label will accompany their names on the **Customers** page > **Users** tab.
## What a member can do
* View and interact with the content that has **Location members** and higher visibility
* Receive and pay for invoices
* Use and buy credits and day passes
* Have a subscription and use all entitlements of their plan
Members become active and count towards your subscription only if they [meet the criteria](/docs/administration/billing/active-users) by interacting with member web portal or mobile app.
Members can also access additional information within the location and take additional actions if they belong to the company. Here are a few examples:
* Members who belong to the company can also use credits and day passes of the company and access other perks given with a company subscription.
* Members who are also selected as managers within a company can easily manage the company details.
* Company members can invite other users to the location.
**FAQs**
In its essence, Spacebring isn't a CRM platform. It is a comprehensive platform for space management — covering customer management, billing, payments, resources, services, and providing a member portal for bookings, payments, and interactions.
That said, Spacebring, as one of its modules, includes the **Customers** page, which has all the essential CRM-like functionality to help you manage both leads and customers effectively. Specifically, the **Customers** page allows you to:
1. List and manage [Members](/docs/customer-management/users/members) (regular customers, typically with subscriptions), [Nonmembers](/docs/customer-management/users/nonmembers) (occasional customers), and [Companies](/docs/customer-management/companies) (with associated members) profiles.
2. In each customer profile, you can set, track, and manage the customer's:
* [Subscription](/docs/billing/subscriptions) and [billing](/docs/customer-management/billing)
* [Assigned resources](/docs/resource-management/rentals/assignments) (desks, offices, etc.)
* [Credits](/docs/billing/credits-and-day-passes/credits) and [day passes](/docs/billing/credits-and-day-passes/day-passes)
* Contract-based start and end dates
* Add internal [Notes](/docs/customer-management/users/manage-account) and [Attachments](/docs/customer-management/users/manage-account#how-administrators-manage-user-accounts) (e.g., verification documents)
* [Contracts](/docs/billing/contracts).
3. Profiles of members and nonmembers also include the history of their purchases:
* Bookings
* Event ticketsShop orders
* Benefit applications
4. You can [invite members](#invite-a-member), [add nonmembers](/docs/customer-management/users/nonmembers#from-the-customers-page), [remove customers](/docs/customer-management/users/remove), and use the [Auto-remove members](/docs/customer-management/users/remove#auto-remove-members) feature to automatically move members to nonmembers when their subscription ends.
5. If you're using the Spacebring Reception app on a tablet, use the [**Leave Contacts** feature](/docs/service/visitors/contacts) to collect contact details of walk-in leads. These details are saved in Spacebring for future outreach.
6. Gain insights with the [**Analytics**](/docs/analytics) [page](/docs/analytics) and [custom reports](/docs/analytics/reports) based on customer activity.
If you're looking for a separate advanced CRM system, Spacebring integrates with popular CRM platforms via Zapier. Explore them here: [https://www.spacebring.com/integrations/crm](https://www.spacebring.com/integrations/crm).
You can [remove the user profile](/docs/customer-management/users/remove) and reinvite them again by stating the new email.
When you invite a user with a specific name and email address, their account is automatically created. Once the account is created, only the user themselves can manage their personal information. To resolve this, ask the user to edit their name on the [**Account**](/docs/customer-management/users/manage-account) [page](/docs/customer-management/users/manage-account).
To invite a member from one location to another location, do the following:
1. Go to the **Customers** page.
2. Open the user's profile.
3. Hover next to the user's name at the top of the page and click **>**.
4. Click **(...)** top right > **Invite as member...** or **Add as nonmember...** > select the necessary location.
5. The user will get an email inviting them to join the new location and will have member access to the new location under the same account immediately. They won't need to log in again or take any other action to gain access.
6. If the customer has a subscription in the first location, [set the **End date**](/docs/billing/subscriptions/cancel) for their subscription to schedule its cancellation or [cancel it immediately](/docs/billing/subscriptions/cancel) and [create a subscription](/docs/billing/subscriptions) for them in the new location.
7. Remove [the user](/docs/customer-management/users/remove) or [company](/docs/customer-management/companies/delete) from the **Customers** of the previous location to make them nonmembers at that location.
 ## Invite a member
Administrators can invite an unlimited number of members to each location. There are several ways to invite members:
* Send individual invitations
* Mass invite members
* Approve requests to join a location
### Prerequisites
1. Make sure that you have [permission](/docs/administration/permissions) to manage **Customers** in the location.
2. Collect the user's personal information: first name, last name (optional), email, and phone number (optional).
### Send an individual invitation
1. Go to the **Customers** page in the necessary location.
2. Press **Invite user** top right.
3. Fill in the user details.
* If you're inviting an administrator, enable the **Administrator** switch and [configure permissions](/docs/administration/permissions).
## Invite a member
Administrators can invite an unlimited number of members to each location. There are several ways to invite members:
* Send individual invitations
* Mass invite members
* Approve requests to join a location
### Prerequisites
1. Make sure that you have [permission](/docs/administration/permissions) to manage **Customers** in the location.
2. Collect the user's personal information: first name, last name (optional), email, and phone number (optional).
### Send an individual invitation
1. Go to the **Customers** page in the necessary location.
2. Press **Invite user** top right.
3. Fill in the user details.
* If you're inviting an administrator, enable the **Administrator** switch and [configure permissions](/docs/administration/permissions).
 * If the user belongs to a company, select their company and manage the **Manager** toggle.
 4. Click **Send invitation**. The user's creation date will appear in their profile in the **Activities** section.
 ### How a user gets an invitation
When an administrator sends the invitation or approves the request to join, the user receives either a default or [custom](/docs/general/customize-emails) invitation email to activate their account.
### How a user gets an invitation
When an administrator sends the invitation or approves the request to join, the user receives either a default or [custom](/docs/general/customize-emails) invitation email to activate their account.
 The user presses the **Activate my account** button and is navigated to member web portal or member mobile app. If the user clicks to activate their account within 24 hours of the invitation time, they are logged in automatically without any verification required.
If users joins later, they are asked to verify their email address with the confirmation code.
The user presses the **Activate my account** button and is navigated to member web portal or member mobile app. If the user clicks to activate their account within 24 hours of the invitation time, they are logged in automatically without any verification required.
If users joins later, they are asked to verify their email address with the confirmation code.
 4. Click **(...)** top right > **Invite as member...** or **Add as nonmember...** > select the necessary location.
5. The user will get an email inviting them to join the new location and will have member access to the new location under the same account immediately. They won't need to log in again or take any other action to gain access.
6. If the customer has a subscription in the first location, [set the **End date**](/docs/billing/subscriptions/cancel) for their subscription to schedule its cancellation or [cancel it immediately](/docs/billing/subscriptions/cancel) and [create a subscription](/docs/billing/subscriptions) for them in the new location.
7. Remove [the user](/docs/customer-management/users/remove) or [company](/docs/customer-management/companies/delete) from the **Customers** of the previous location to make them nonmembers at that location.
4. Click **(...)** top right > **Invite as member...** or **Add as nonmember...** > select the necessary location.
5. The user will get an email inviting them to join the new location and will have member access to the new location under the same account immediately. They won't need to log in again or take any other action to gain access.
6. If the customer has a subscription in the first location, [set the **End date**](/docs/billing/subscriptions/cancel) for their subscription to schedule its cancellation or [cancel it immediately](/docs/billing/subscriptions/cancel) and [create a subscription](/docs/billing/subscriptions) for them in the new location.
7. Remove [the user](/docs/customer-management/users/remove) or [company](/docs/customer-management/companies/delete) from the **Customers** of the previous location to make them nonmembers at that location.