Create a room booking
To book a room, users go to Locations > Rooms > select the date and timeslot you need in the rooms’ calendar.To view the description and properties of the specific room, click the ⓘ button next to the desired room’s name. To open the room’s weekly booking calendar, click on its title or photo.

- Title — the name of the booking. Control the visibility of the title on the Account page.
- Time — booking is possible according to the booking rules (minimum time, maximum time).
Users and administrators can book any available current or future slot, but only administrators can log past bookings through the admin web portal.
- Repeat — available only if the room is completely free. Choose one of the suggested recurrence patterns or select “Custom” to set your own recurrence pattern.
- End repeat — choose:
- On date — to set a specific final booking date, or
- Never — to set an open-ended recurrence
- For “Custom” recurrences, users can also choose After number of occurrences to schedule a specific number of recurring bookings.
Users can create recurring bookings only for completely free rooms. If the room booking is paid, administrators can create a recurring booking for the customer and charge them separately.
- Booker — user for whom the booking should be made. This feature is exclusive to administrators and company managers, who have the authority to create bookings on behalf of company members when needed.
Company managers can make room bookings for other company members either with company credits or a company invoice.
- Invitees — users who attend the booking alongside a booker. Members can select booking invitees in two cases:
- If they belong to a company, they can select invitees from their fellow company members.
- If the Community is set to be visible to members, members can select invitees among other members of this location.
- Memo — a private note visible only to a booker and administrators.
- Promo code or coupon — allows a user to redeem a discount on the room booking if they qualify for any discounts.
- Payment. Understand payment methods. The total price for a booking will be calculated based on the price tiers added for this room, factoring in any applicable discount from the user’s subscription or entered promo code.
- Legal business name, Address, and Tax ID. These fields appear depending on the “Require billing details” setting.


Add to calendar button opens the default calendar on the user’s device.
View room bookings
- Users can see their room bookings on the Account > Bookings page.

- Users can also find their bookings on the calendar on the Rooms page.

- Upcoming bookings appear for them as a reminder on the banner on the Locations page.
- Users receive notifications-reminders before the booking starts and ends. Understand users’ notifications
- Invitees view bookings on the widget and receive notifications when the booking is created and about to end.

Manage a room booking
To manage a room booking, users follow these steps:- Open the booking > press
Editto make changes. Edit a booking - Press
Cancelto cancel a booking. - Press
Add to Google calendarorAdd to Microsoft 365 Outlookto add the booking to your calendar.

Troubleshoot issues with room bookings
If a customer faces an error with creating or editing a booking, follow these steps to identify and troubleshoot the problem.The booking period is invalid
The booking period is invalid
The user will see a “The booking period is invalid” error message when editing the booking date if the current location schedule is different than it was at the moment of booking creation. For example, if the booking end time is 11 PM but the location is open up to 10 PM, the user will receive an error.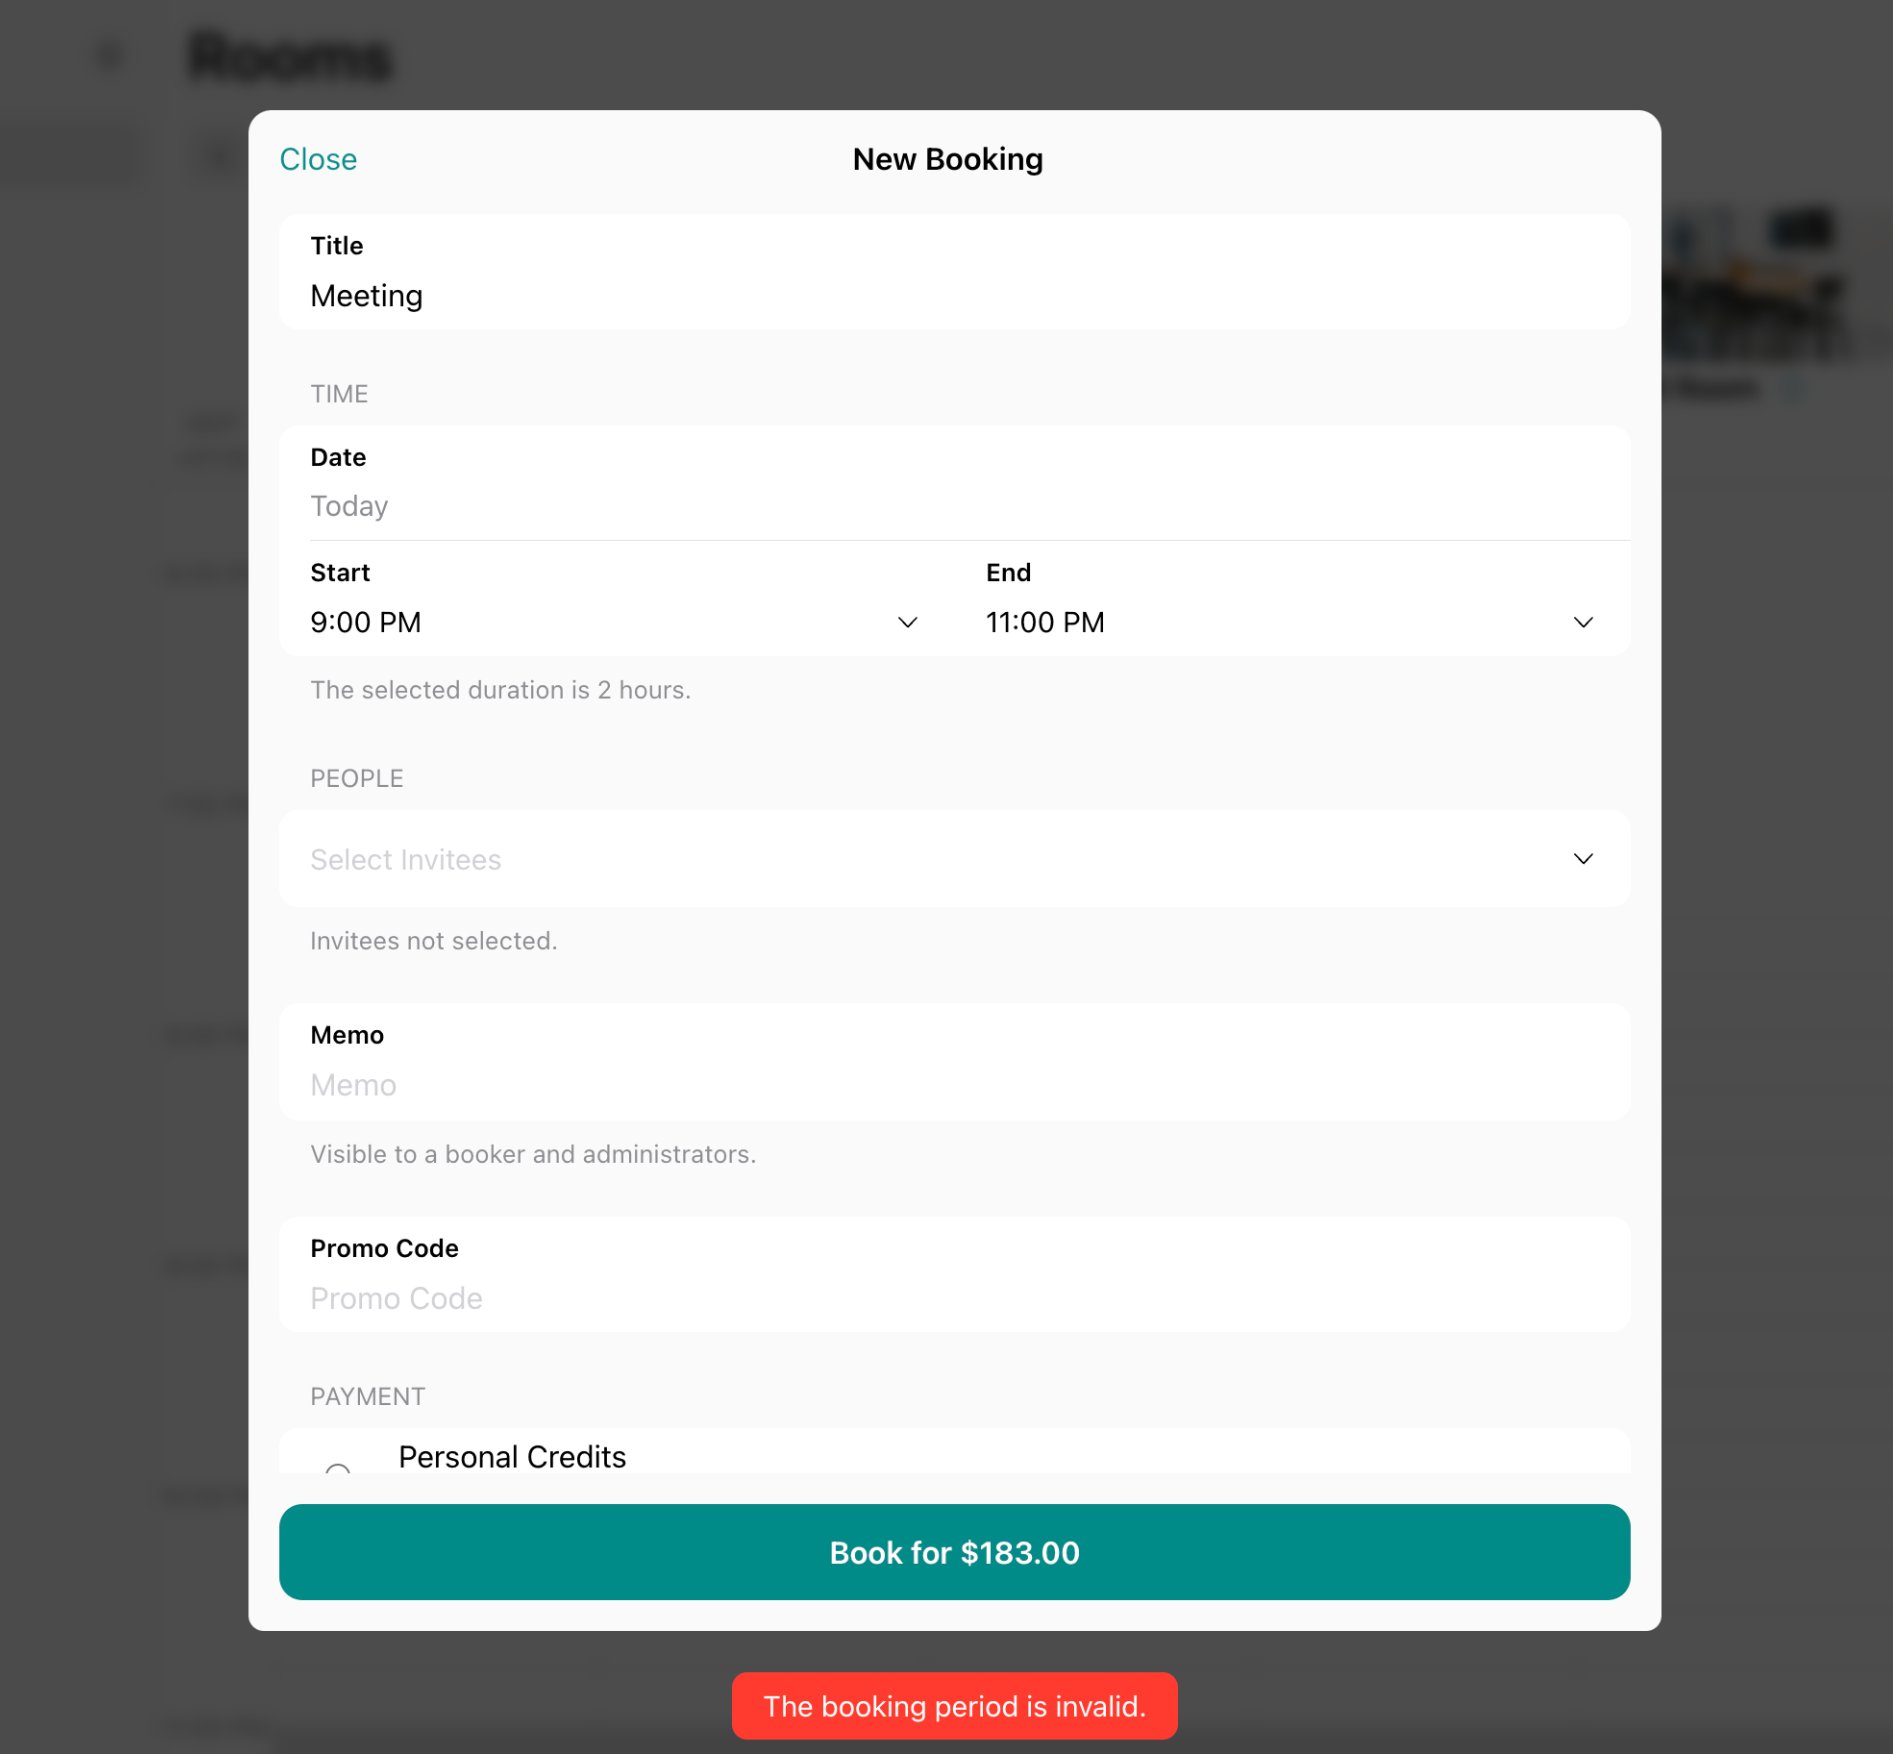
- Go to Location settings page by pressing the menu (…) near the location name > General > in the “Schedule” section, open the “Default” schedule > change the hour in the “Until” field > press
Save. - Ask the member to edit their booking again.
- Go to Location settings page > General > in the “Schedule” section, open the “Public” schedule > change the hour in the “Until” field > press
Save. - Ask the nonmember to edit their booking again.
Another booking already exists
Another booking already exists
If the user is editing the booking time and another booking already exists at the selected time, the user will see the “Another booking already exists at the same time” error message. To resolve this, the user can select another time.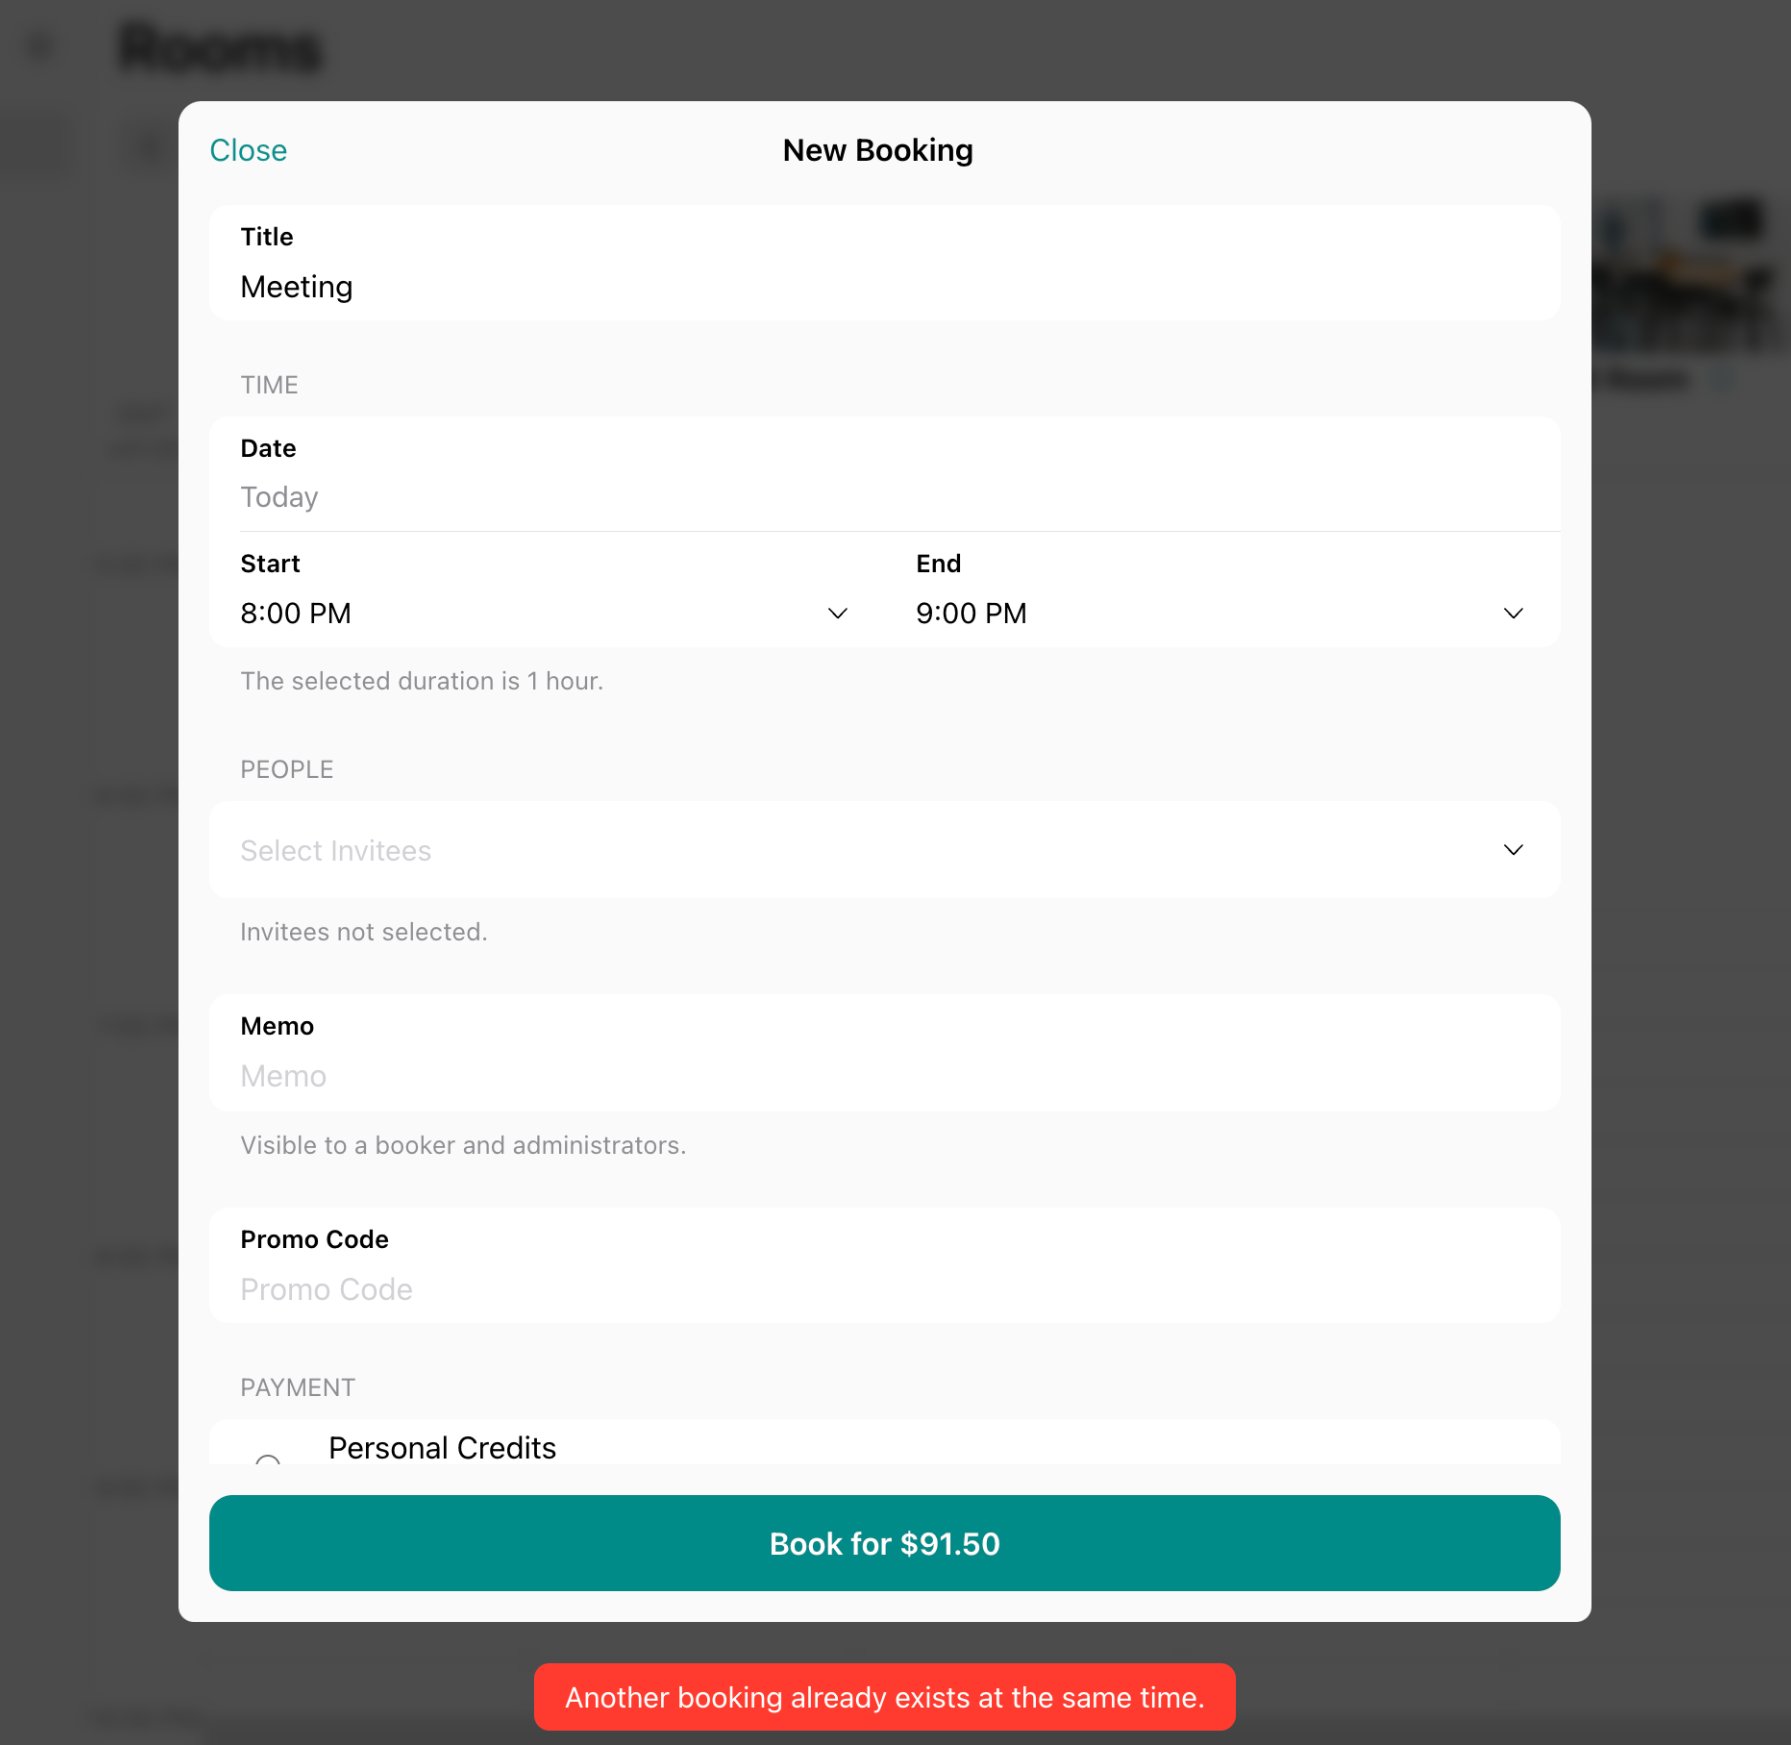
Existing active free booking
Existing active free booking
The user may see a “You already have an active free booking” error message when creating a free room booking if they already have another active room booking.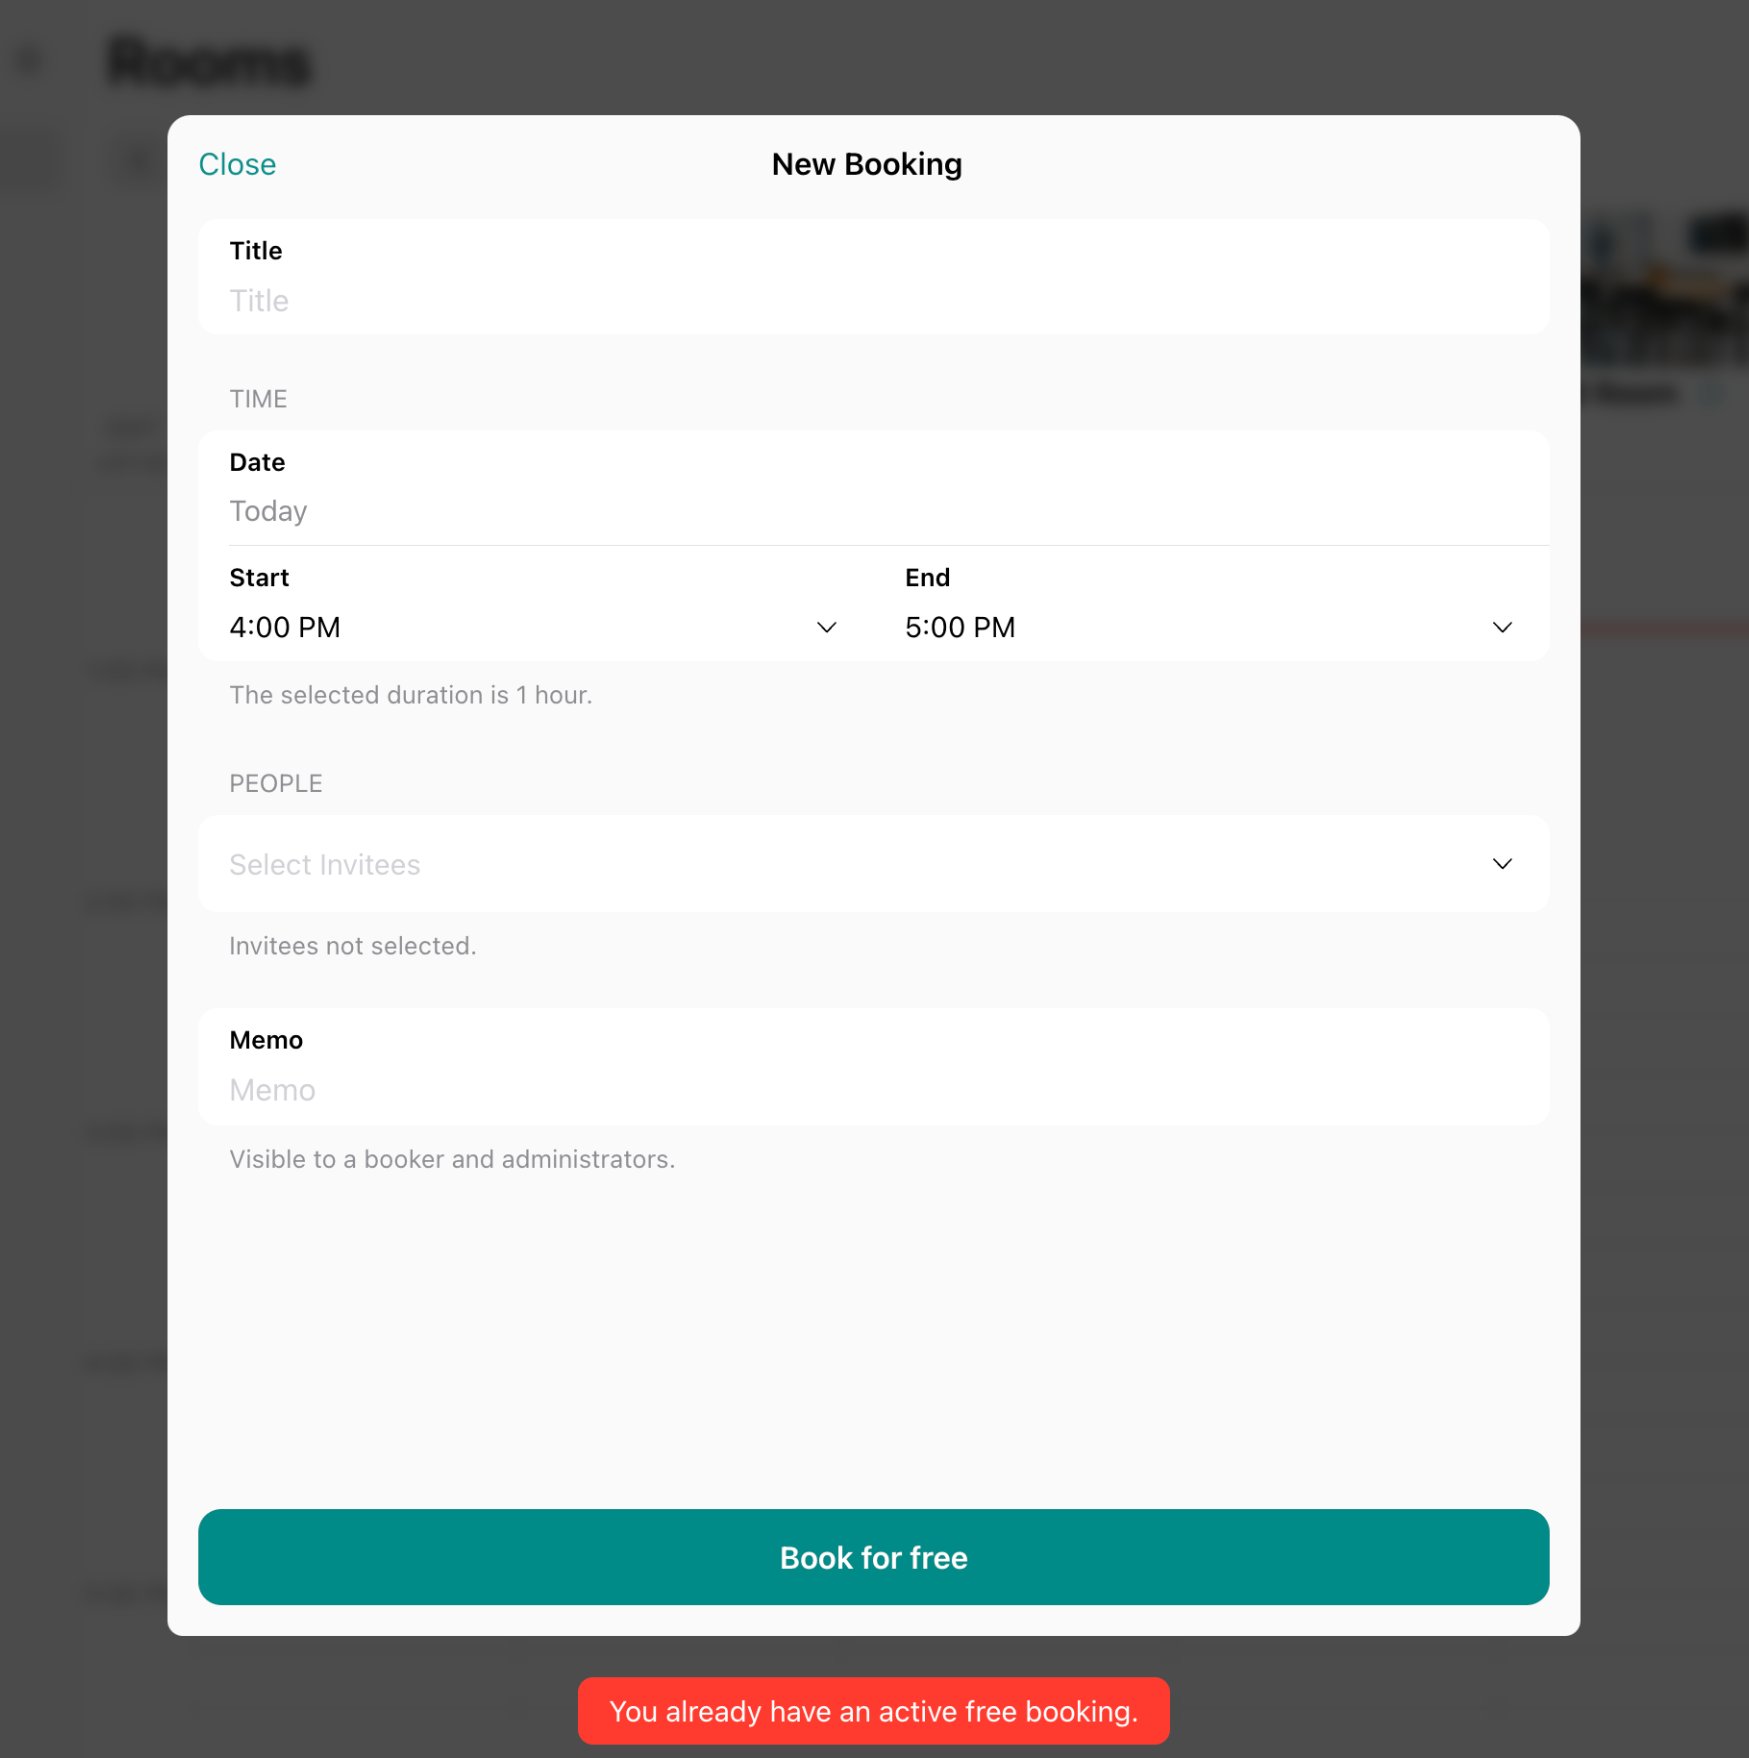
This error appears only if the room is free of charge.
Select a correct date
Select a correct date
When changing the date in the room or desk booking, the user may see a “Select a correct date. This day is not available” error message if the selected date is unavailable in the configuration schedule.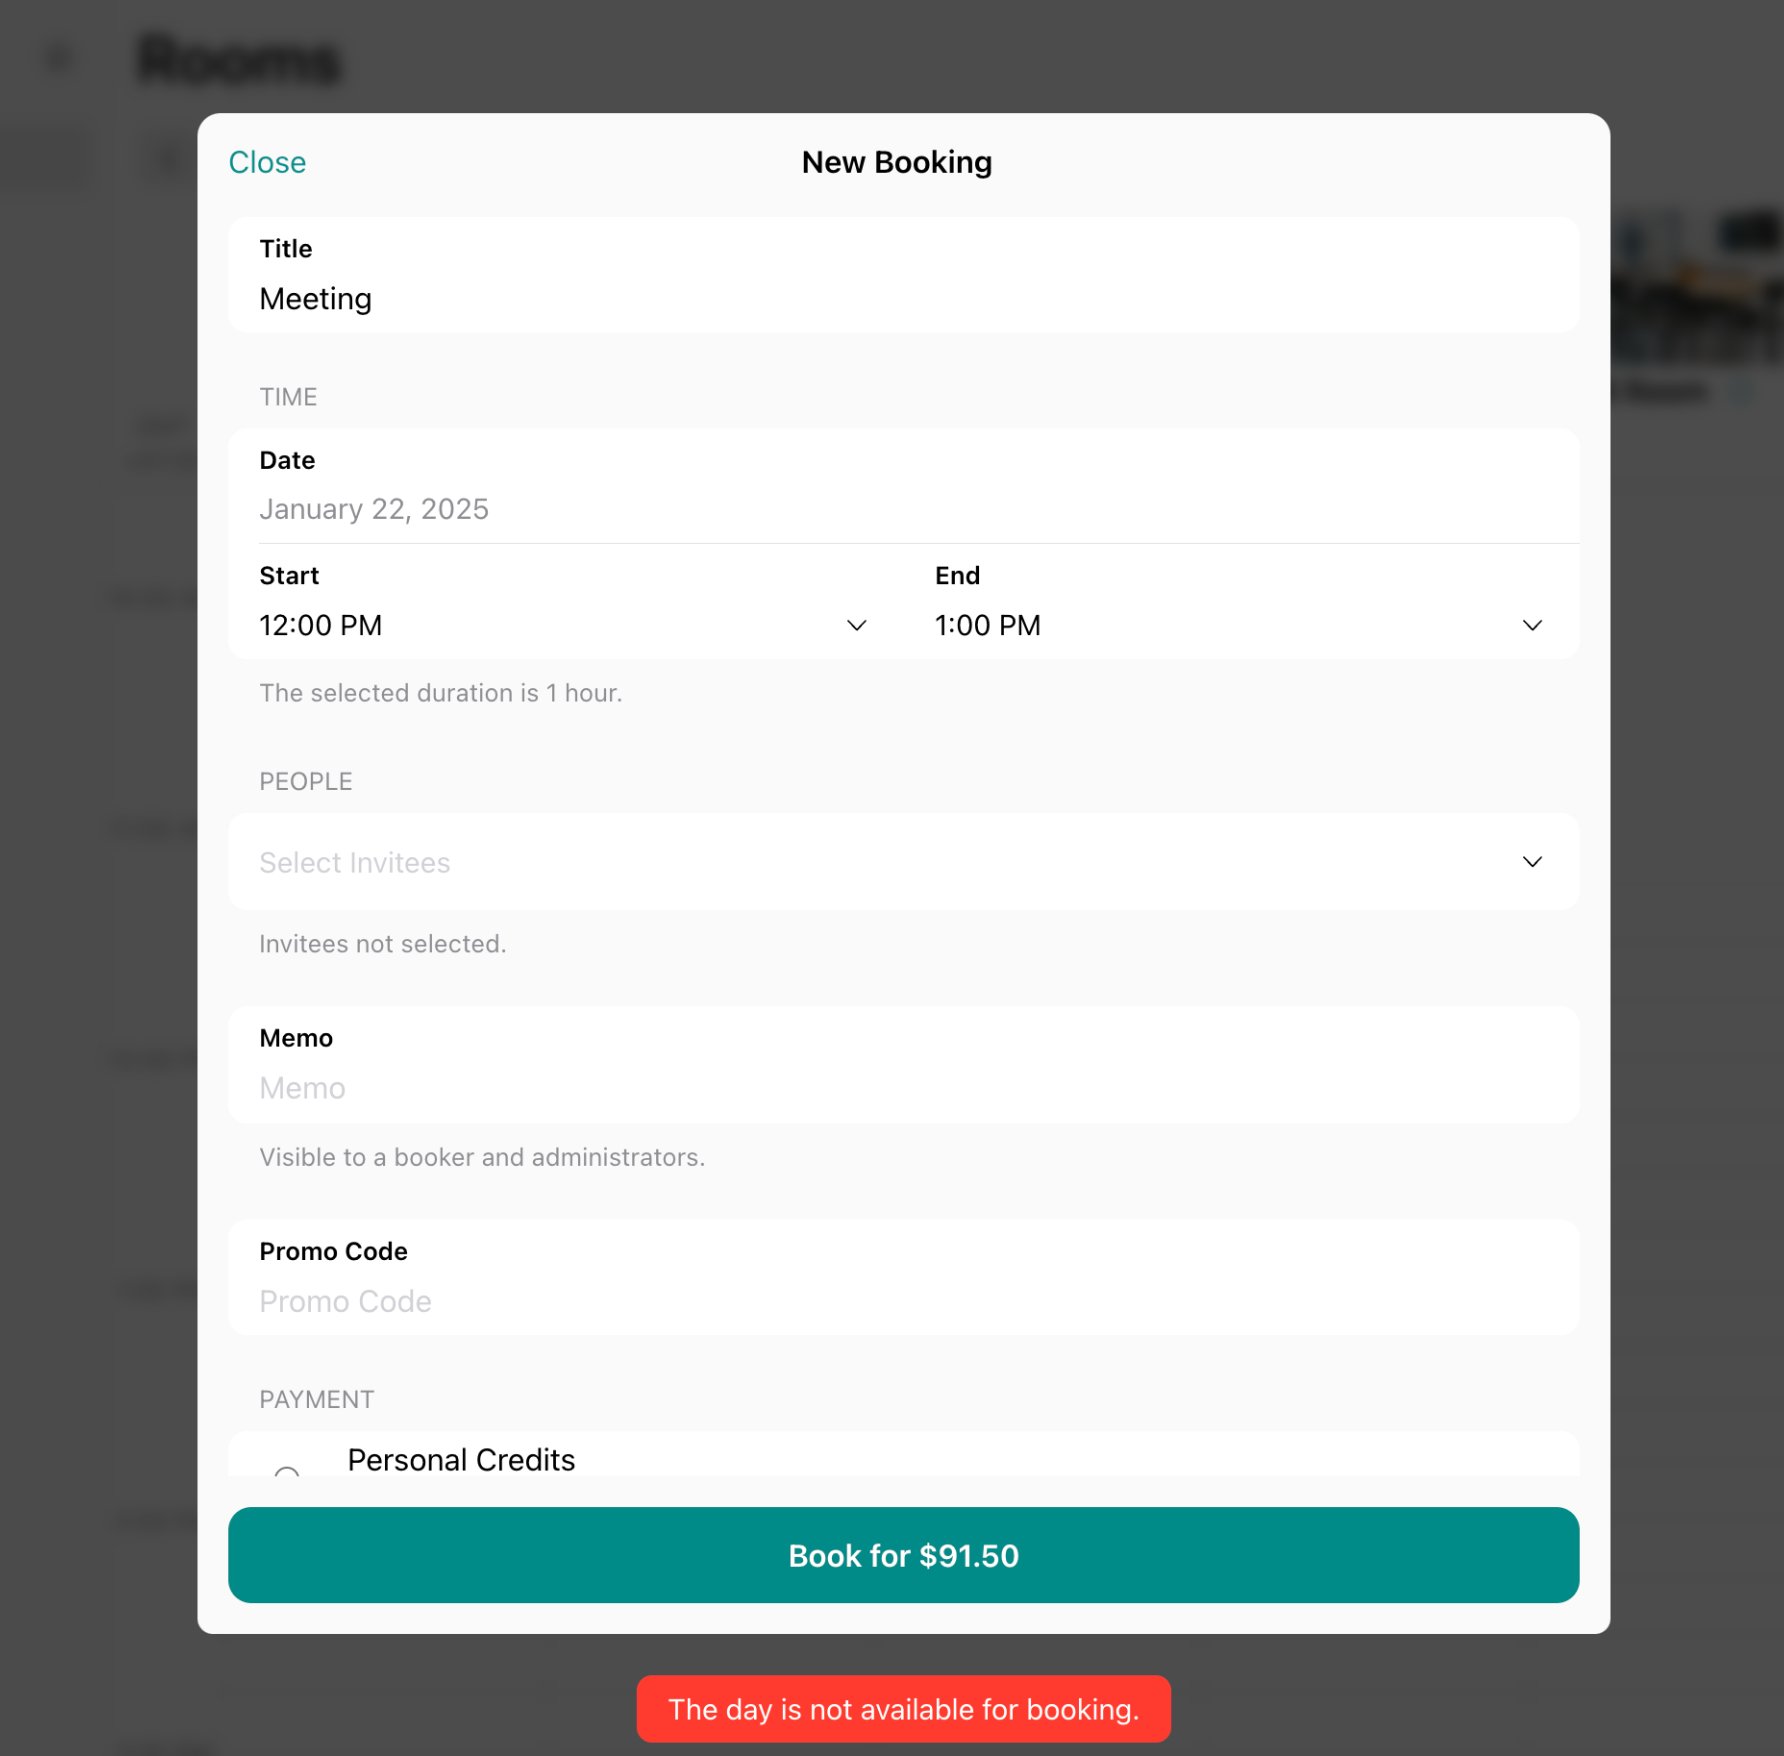
- Go to Location settings page by pressing the menu (…) near the location name > General > in the “Schedule” section, open the “Default” schedule > in the “Closed days” section, remove the necessary date > press
Save. - Ask the member to edit their booking again.
- Go to Location settings page > General > in the “Schedule” section, open the Public schedule > in the “Closed days” section, remove the necessary date > press
Save. - Ask the nonmember to edit their booking again.
Our recommendations
Our recommendations
- Ensure to have the correct schedule for your members and nonmembers. Configure the location schedule
- Check the general settings such as “Book Ahead” and “Book for Free” for all rooms on the Location settings page > General > Rooms page.
- Check each room’s settings that impact the room booking creation and editing. These are “Availability increments”, “Min & Max time”, “Preparation time”, “Rescheduling policy”, and “Abandoned booking protection” (if the room is totally free of charge). Edit a room
- If you have room, desk, office, or parking lots, booking permissions set as location members or network members, ensure to have the Support page publicly visible so that nonmembers can apply for room bookings.
Why are some booking titles/bookers' names not visible?
Why are some booking titles/bookers' names not visible?
The visibility of users’ names and booking titles depends on each user’s privacy settings. The highest visibility level is “Administrators”, so administrators can always see users’ names and titles on bookings. Meanwhile, members and nonmembers cannot see each other’s personal data on the bookings unless bookers select the relevant personal data visibility in their account privacy settings (e.g., “Company members,” “Location members,” etc.).
How can I check who canceled the user's booking?
How can I check who canceled the user's booking?
There may be times when you need to know who canceled a user’s booking—whether it was the user themselves or an administrator. To quickly find this information, you have two options:
- Check the cancellation notification on the Notifications page. Make sure you have these notifications enabled to see the details.
- Go to Customers > user profile > Bookings, find the canceled booking, and you’ll be able to see who canceled it.
Why does the message 'There is no payment method to make a reservation' appear?
Why does the message 'There is no payment method to make a reservation' appear?
Users will see the “There is no payment method to make a reservation” message under the Payment section if your location doesn’t have a payment gateway connected. To fix this:
- Firstly, ensure you have a payment gateway connected to your location.
- If you already have Stripe connected but users still see this message, please go to Integrations > Stripe page and check the switches in the “Payments” section to ensure Stripe payments are enabled for the necessary services.
Why does a customer's booking have a lower price?
Why does a customer's booking have a lower price?
If a booking appears with a lower price, it’s likely due to a discount being applied. To check it:
- Click on the booking > click on the “Payment” section in it.
- Look for the “Discount” or “Promo code” field. This will indicate if a subscription discount or a promo code was applied.
- If you see a “Discount” section, it means the user has a discount on this resource or service type through their personal or company subscription. Open their subscription to adjust it, if needed.
- If a booking shows a discount but the customer’s current subscription doesn’t, it means that the discount was active only at the time of booking creation and has since been removed or changed in their subscription.
Keep in mind that subscription-based discounts work cross-location, meaning a user might have a subscription with a discount in any location within your network.
How are rooms ordered?
How are rooms ordered?
Rooms assigned to the customer appear first, then the rest are sorted alphabetically by title and, when titles match, by creation date from oldest to newest.